

Are you planning a stone project in the garden? Maybe you are already working on your new patio or driveway? Once your last stone is laid, you need a good joint sand to finish with. Here we guide you to joining tiles or paving stones with Flexible Hard Joint .
Choose the right grout for your paving stones and tiles
There are different types of grout on the market. We recommend Flexible Hard Joint in nine cases out of ten. It hardens in contact with water, which means that it keeps weeds and ants away from your paving. The joint also becomes elastic, which allows movements in the ground without damaging the joint. As this type of joint is draining, do not use it for paving stones and tiles on cast soles. In these cases, use a cement-based hard joint!
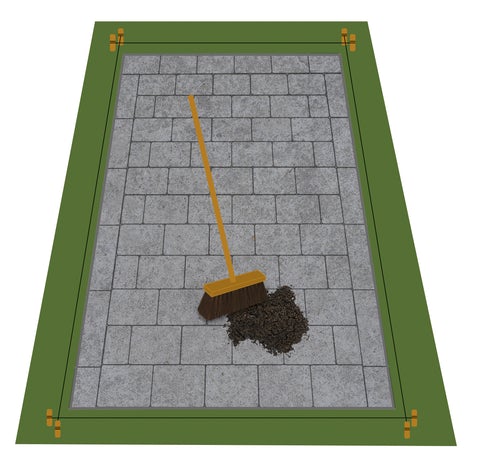
Use a soft brush, ground vibrator and leaf blower
When you are going to join the surface of paving stones or tiles, you need (in addition to the sand) a soft broom or brush, a lighter ground vibrator with a rubber sole and a leaf blower. You use the brush to get the joint sand down properly in the cracks while the ground vibrator helps the small grains down to a good depth. The leaf blower then ensures that the dust from the joint disappears from the surface of the stone before it is to be watered and hardened.
Rent the equipment
You also need a ground vibrator for the preparation of the paving. They are available in different weight classes where you choose a suitable one according to the nature of the project. The heavier the load the surface must withstand, the heavier ground vibrator you need. For the joint, however, we recommend a lighter ground vibrator with a mounted rubber sole that gently but effectively vibrates the sand between the ground stones.
Read more about how to fix a wobbly paver >
You need so much joint for your paving stone
Calculate that a sack with 20 kg hard joint is sufficient for an area of about 10-15 square meters and with small joint widths (up to 1 cm between the stones). In addition to the joint width you use, the consumption also depends on the thickness of the paving stone and the load that the surface must be able to withstand. If it is a driveway, we recommend a joint depth of at least 4 cm and for patios and corridors at least 3 cm, but you can fill the entire depth of the stone.
Apply your hard joint step by step
Joining is easy! Just be sure to be careful and cautious in the various steps.
1. Make sure the surface is clean and dry
Flexible Hard Joint is perfect to apply on a sunny and warm day. Keep in mind that your tiles and paving stones need to be completely dry when you start as the hard joint hardens in contact with liquid. If you want to apply a new joint to an existing surface with paving stones, we recommend that you remove all old joints before you start. Make sure that no residue is left. Even newly laid stone surfaces need clean and attractive joints before you start.
2. Fill with sand and use the ground vibrator to help
Pour the sand over your stone surface and sweep into the cracks with the brush. Remember to brush gently and finely over the surface so that the grains remain in the joint. Then use the ground vibrator and work with it back and forth over the surface to get the sand grains down into the cracks. NOTE, do not forget the rubber plate! Then repeat the procedure, applying new sand and brushing until you have filled the entire depth of the joint.
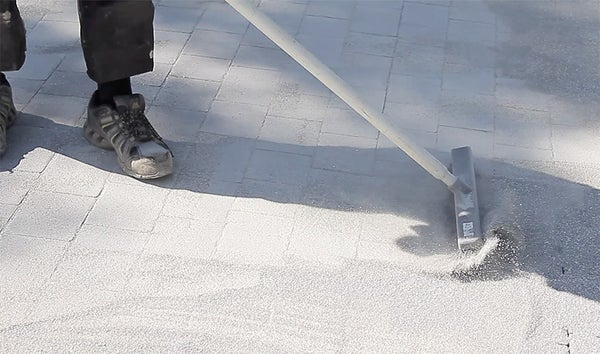
Blow away joint residues from the paving stone
Hard joint solidifies in contact with liquid. To avoid joint residues that harden on the paving stone, therefore proceed carefully with the leaf blower over the surface. Be careful that the dust disappears, but keep it at a distance so as not to blow the joint away from the cracks. Should it still happen, go back to the previous step and top up with sand where needed.
Moisturize the surface with a wide jet
When the joints are filled and the stones are sand-free, it is time to water. It is enough that you moisten the surface and you do this best with a wide jet on your water hose. By having a low pressure on the jet, you also avoid the mistake of flushing the newly laid joint from the cracks.
After the jointing is complete, let the surface rest for a couple of days so that the joints can harden properly. In other words, do not load your new driveway with the car immediately after. Hold on and then enjoy your maintenance-free stone surface.


Leave a Reply
You must be logged in to post a comment.